Monday 27 July 2009

Acrylics 3

This time I wanted to try different colours. It took several layers to reach a result I was happy with: green glaze base coat; daubs of light blue & yellow squares: dark blue glaze spritzed and then sanded once dry; purple paint through sequin waste; clear glaze; white rings and blocks; numbers stamp in teal; spritzes of Glimmer Mist dabbed with kitchen towel to soften.

Sunday 26 July 2009

More acrylics

After my experiment yesterday, I decided to do some more work with acrylics.

This piece is the result of several layers: orange glaze; squares of light blue, green and brown spritzed with water and then dabbed with paper towel; red glaze also spritzed and then sanded when dry; dabs of ochre paint added to give some highlights; shiny teal paint dabbed on through sequin waste; rings applied by applying paint to the bottom of a beaker and pressing onto the paper; and lastly more dabs of ochre paint.

Sunday Postcard Art - fashion

I had great fun with this one! To start, I erased the background from the film strip and added this to the script background. I copied several images of the Time Magazine (a freebie) and layered them over each other, changing the angle each time. I then cut out the image of the woman from the magazine and made it small enough to fit into one of the apertures of the film strip. Once it was the right size I duplicated it several times to fit into the other apertures. I then added the picture of the second woman (another freebie), originally black & white, and coloured her clothes. For a bit of fun I added the dog (by iTkUpiLLi), colouring its coat pink. I added the frame as the final touch.

You can see the elements I used below.

Saturday 25 July 2009

Experimenting with paint

This morning I had fun playing with acrylic paint and this was the end result.

To start, I painted a piece of 10 x 7 inch watercolour paper with yellow acrylic paint. Once dry, I painted over it with a mixture of 1 part orange paint and 2 parts glossy gel medium. Before this dried I sprayed it liberally with water. After four minutes or so I dabbed off the remaining water with kitchen towel, thus revealing some of the yellow paint underneath. In the lower left and upper right corners I then transferred some text using gel medium, leaving a little of the paper behind for texture. I then dabbed bronze ink through sequin waste over these areas. Next I painted on the blue squares. Whilst wet, I used a coffee stick to draw patterns in the paint, revealing the orange paint underneath. I also added some swirls with the coffee stick and then edged the paper with the same blue paint. When dry, I daubed on some brown paint in some of the gaps. Once dry, I partially sanded these areas down to the next layer of paint. I then added some more yellow paint over the top, again dabbing it of with kitchen towel so that it wasn't too thick. When this was dry I stamped some Paper Artsy images and hey presto!

So Artful challenge

The So Artful challenge this week was to incorporate the image of the tawny owl into a piece of art. To achieve this, I added the image of a snowy owl into the background, which I then illuminated. A frame helped to highlight the tawny owl's feathers.

Birds

To create the background for this picture I used blotches of soft pastels on water colour paper. Once the paper was covered I used my finger to blend the different patches of colour. I then sprayed the paper with some coordinating Glimmer Mists. Once dry I used Tim Holtz stamps to add the foliage images. To give some focus, the birds were stamped onto the background and coloured with a Promarker pen. Finally, I edged the paper with ink to give it some definition.

Monday 20 July 2009

Vintage child

The challenge set by Sunday Postcard Art is 'Vntage Children.' This is my fun response!

Saturday 18 July 2009

Collage

This is an 8 x 8 inch collage that I made this afternoon.

To start I tore up pieces of paper and laid them on my canvas board. When I was happy with the positioning I glued them on using matt gel medium. I then painted on gesso, pink and brown acrylic paint in a random fashion. Once dry I used a Clarity Stamp in each corner, embossing them with copper embossing powder. I did the same using the Tim Holtz 'memories' stamp. For the centrepiece, I tore a piece of DCWV script card and embossed the edges with the copper embossing powder. After adjusting the colours of a digital collage I had made previously and edging it roughly with a copper Krylon pen, I stuck it at an angle over the script, finally gluing the two layers to the centre of the board.

Tears of an Angel

'Tears of an angel' is the theme of So Artful's challenge. This is my interpretation: It may be hard to see the tears, but they are definitely there!

Distress inks with Perfect Pearls

The challenge from Saturday's Workout this week is to use Tim Holtz's technique of dusting an image stamped with Distress Ink with Perfect Pearls.

To start, colour the tag with wet Distress ink, drying with a heat gun. Once completely dry stamp an image with Distress Ink. Whilst still wet dust Perfect Pearl powder over the stamped image, brushing off any excess. Then spray the image with a little water so that the Distress Ink bleeds from under the Perfect Pearl powder. Once happy with the degree of bleeding, dry with the heat gun. Add further stamps as required and edge the tag with other colours of ink.

The tag on the left is a direct copy of the one Tim Holtz makes on one of his videos (see his website). The one on the right uses the same principles but uses different colours and stamps. Unfortunately, the picture doesn't really show the shine that the Perfect Pearls add, but it is very apparent in real life. Not as good as Tim's, but, again, not bad for a first attempt!

Stampbord

Stampbord is a 3mm thick board, covered in a smooth white stamping surface. I bought some in a sale ages ago but until now had not used it. So, this was another experiment.

I covered the board with three shades of alcohol ink. Once dry I then stamped the Tim Holtz image using black Stazon ink. Using a scratch knife, I scratched the white shadow around the stamped image. The scratch knife scratches away the layer of alcohol ink revealing the original white surface underneath. Using the same method I then added the decoration around the sides and once complete drew on the black lines. To finish, I applied silver Krylon ink to the edges of the Stampbord, it is just possible to see this at the bottom of the picture.

I was quite pleased with this for a first attempt.

Friday 17 July 2009

Word salad!

Here is my entry for the Three Muses challenge, 'word salad.' Another digital piece; I had fun playing with the layers.

Altered book 6

Again, these two pages use copies of the bird collage; two slightly different versions, with the one of the left reversed. Before applying the pictures I inked around the edges of the pages with coordinating colours.

Altered book 5

For these pages I used a print of a collage I had made previously as the basis. I layered it on to some card and stuck it onto the stumps of some pages I had cut out at the beginning of the project. I then coloured the neighbouring pages with Starburst Stains and, when dry, stamped them with the same Tim Holtz bird stamp that I had used for the collage.

UTEE again

Here is my second attempt at using UTEE in the melting pot and then stamping into it. The picture doesn't quite do it justice, but you get the idea.

Peacock feather - UTEE

This was my first attempt at melting ultra thick embossing enamel (UTEE) in my melting pot. I picked up a very helpful hint from Dawn Bibby on QVC: cut a piece of a non-stick, heat resistant craft mat to fit the bowl of one's melting pot. When the UTEE has melted pull the mat out onto a flat surface and stamp into the molten UTEE.

Here I used clear, copper and jade UTEE. Once melted, I inked my Graphicus peacock feather stamp with brown Stazon ink and stamped into the molten embossing enamel. Once it had cooled down a little I peeled off the stamp and hey presto! Not bad for a first attempt, although I do say it myself. I then added it to some coordinating layers to make a card.

ACF 35 - happy family?

Art Creations Friday challenge this week is to use the image of the little boy on the chair. I decided to go black and white. Below, you can see the elements I used to make my picture.

Thursday 16 July 2009

Bingo!

Quirky, or what? I made this as a response to the Crazy Amigo challenge, the theme being bingo. I blended the image of the Eiffel Tower into the bingo card background. Buttons were used for the bingo markers and the image of the lady, care of iTkUpiLLi, was added to the left hand side.

Saturday 11 July 2009

Saturday Surprise - family

This is my entry for Saturday Surprise's challenge 'family'. I decided to go go grunge! To make this card, I distressed some watercolour paper by crumpling it and then applying Distress Ink to emphasise the crumples. I then stamped on the Tim Holtz image and coloured it with watercolour pencils. For the background I layered a large piece of distressed brown card onto a cream A6 card and added a distressed strip of card slightly left of centre on top of it. The image was attached over this. I then added the distressed Tim Holtz Adage Tickets and the flowers for embellishment.

Friday 10 July 2009

ACF challenge 34

This week Art Creations Friday provided the background for their challenge. I turned it around and then added the violinist, colouring the original black and white image and blurring it into the background. The corners and the phrase added the finishing touches.

Thursday 9 July 2009

Noticeboard - pink & brown

Theme Thursday's challenge this week is 'pink and brown.' This is my entry, a digital collage simulating a noticeboard.

Wednesday 8 July 2009

Rust - cutie patootie

This piece is to meet two challenges at once.

Go Make Something's challenge this week is to make something inspired by rust. So this is my entry, which uses a rusty background, rusty crown and a rusty hinge.

Three Muses' challenge is to make something surreal, so I hope this fits the bill. I liked the sullen image of the little girl with wings. if that's not surreal I don't know what is!

Monday 6 July 2009

Altered Book 4

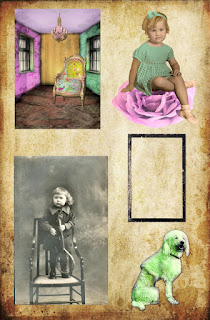
Here are four more pages of my altered book that are now decorated. Fairly rudimentary, but at the moment it is all experimental. To start, all the pages were roughly painted with acrylic paint.

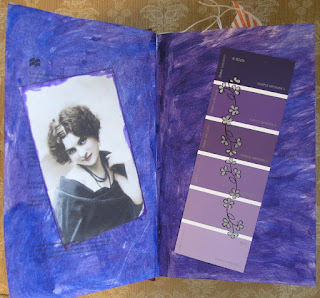
On the left page I added a picture, the image supplied by ACF for their challenge this week. On the right-hand page, I added a paint sampler having first stamped on it some flowers that I then coloured with a silver Krylon pen.

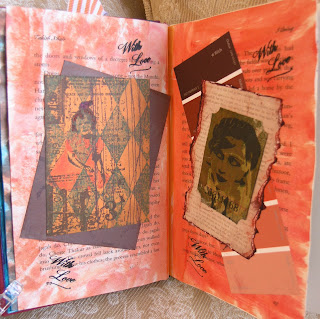
On this left-hand page I used Tim Holtz stamps for the image and then layered it at an angle on to brown paper. For the other page, I again used a paint sampler, but this time added some distressed paper and the image on top. This was made by using a Tim Holtz mask & spraying with Adirondack Colourwash. I then stamped the french lady on top, a stamp designed by Susie Jefferson for Blade Rubber Stamps. With love was then stamped twice on each page.

Lady in a nest - Sunday Postcard Art challenge

I fancied doing something a bit quirky - so here it is!

Sunday 5 July 2009

ACF challenge 33

Art Creation Friday's challenge this week is to use the image of this women.

Onto a grunge background I added an altered image of a photo I had taken of Sacre Coeur. Between the layers I then added a shadow image of the woman. Various bits and pieces were added for texture and then finally the image of the woman was placed in the lower right corner.

Wednesday 1 July 2009

Dragonfly

More digital experimentation!
This is the same background that I used in the ACF challenge 32, but somewhat altered. I then added the dragonflies, corners and the light effect. I decided to go with the dragonfly theme so that could enter the Awfully Big art Adventure challenge.

Dans ma maison il y a ... cheerfulness

I am having fun experimenting with digital graphics. I have recently bought some digital collage sheets to play with and so I couldn't resist entering the 'Dans ma maison il y a ...' challenge this week, with the theme cheerfulness.

Fun, eh?