
This morning I made a second small plaque, using the same techniques that I used on the plaque below.

This morning I made a second small plaque, using the same techniques that I used on the plaque below.

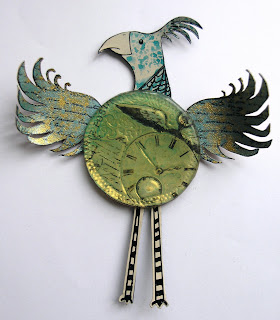
I made this small plaque, 3 x 3 inches, this afternoon.
I started with a scrap of metal which I embossed with the uneven rectangles, using an embossing board. This was then stuck on half of a chipboard square previously primed with gesso. I painted the other half of the square with copper Ferro paint, overlapping the embossed metal. Whilst the Ferro paint was still wet I stamped into it to create a textured pattern. Once dry, I painted both the metal and Ferro paint with turquoise Viva paint. I highlighted the texture of the metal with copper Viva paint before applying some green Viva paint to both the metal and Ferro paint. The bird is made of Grungeboard, stamped twice so that I could add a second wing to give some dimension.

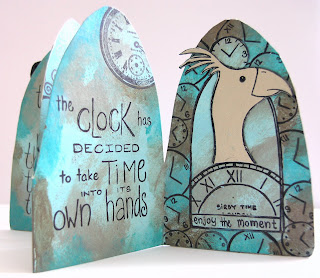
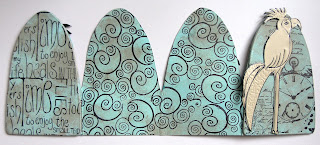
 The first stage of this project was to make the pages and glue them to the chipboard covers. We then decorated the surfaces of the book by dabbing on acrylic paint, aqua and mushroom in my case. The quotes and arches were then stamped onto the inside pages. The borders were darkened by masking the stamped areas and then stamped upon. Masks were then placed around the arches and clock images stamped within them. Metal birds were strategically placed over the clocks.

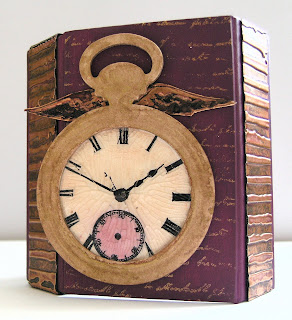
 Pink is not usually a colour I would choose, and so for this project I decided to move out of my comfort zone, although I wasn't brave enough to go for the pale pink! We painted the box surfaces in the colour of our choice i.e dark pink for me.
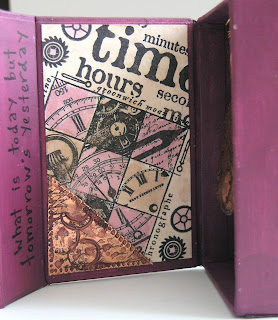
We created two collages with stamps and painted them with various Glimmer Mists (a technique discovered by Lin & Leandra). When ready, these were glued to the inner surfaces of the box and a quote stamped onto the inner flap.
 Next came the copper embellishments. The strips around the box, a corner piece on the first collage, the wings on the front of the box and some time pieces inside. These were all stamped onto the metal, cut out and decorated with pink Glimmer Mist.

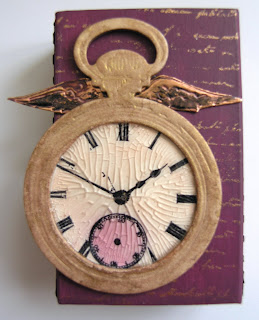
The decoration on the front was made by sticking a painted, stamped image behind a chipboard fob and filling it with crackle paint (left overnight to dry).
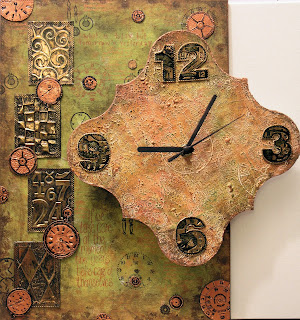
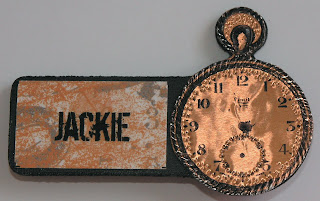
When we arrived we were all presented with a badge that featured a clock, as the theme for the weekend was 'Time'.
During the weekend we carried out four projects, the biggest of which was to make a clock ( I still have some finishing touches to put to this!). The other projects were a winged motif, a decorative box and an arched mini book.

I copied the flowers on the left and laid them along the bottom, softening the edges, to create a frame. Then came the tag and the flower on top. I softened the light of the flower making it a little translucent and then erased the writing on the tag underneath the middle of the flower, to make the middle look solid. To finish, I added the three buttons in the right-hand corner and the frame.
Hope you like it!

Whilst on holiday, I bought a plain wood little house. Time to play.
I primed the wood with gesso and once dry painted it with turquoise and copper paints. On top of this I painted a splodge if crackle paint and highlighted the cracks with copper paint. Once I had added some stamps to some of the edges I stuck on some German Scrap that I had stained with stream alcohol ink. Having stuck on some relevant quotes I coloured these with turquoise ink. To add some finer detail I highlighted some of the stamping with a turquoise metallic pen and added some turquoise and coppers pearls, using pearl pens. Last but not least, I added the grungeboard butterfly which I decorated with a butterfly stamp and Glimmermist.

I started with a rusty background and superimposed the image of the house. then came the characters. I changed the colour of the children so that they fitted in better. To give it more focus, I added the frame and changed the background colour from white to black.
To start, I daubed some white gesso randomly onto some of the pages. Once dry, I just started stamping, using Stazon on the perspex pages and a variety of inks on the others.
I added some words, in a variety of forms, and also added some colour and embellishment in various places using marker pens. To set the whole book of, I added some ribbon in complementary colours to the jump rings holding the pages together.
When you look at the pictures below, you can see how the images change as the perspex pages are turned.


Let me know what you think.

I created this piece in response to Sunday Postcard Art's challenge.
The 4 x 6 inch background is by iTkUpiLLi. Onto this I stamped an arc and the word 'bird' several times. I then stamped a blackbird so it appears to be standing on one of the words and glued on a larger bird onto one of the lower words. In the top right-hand corner I collaged a piece of grey and white napkin, over which I added a ticket. I darkened this using Distress Ink. To finish I added some black peel-offs to three of the corners and filled in the gaps with faux stitching.
All the stamps are by Paper Artsy.

I made a collage background and covered it with a wash of burnt sienna acrylic paint. Then came the arrows, stamps by Blonde Moments used with brown Stazon Ink. To give some colour I drew some patterns with gel pens and then added the children with wings (care of Lisa's Altered Art). Now for the cut! I divided it into the 9 sections. The individual cards needed something else, so I then wrote a story making sure it made sense as one big picture and on each individual ATC. Done!

The challenge this week from Saturday's Workout is to create a page of nine Artist Trading Cards i.e. 9ers.
To start, I covered a 7.5 x 10.5 inches piece of card with various colours of Distress Ink. Once dry, I sprayed some Radiant Rain over several masks. When this was dry, I stamped on a variety of Tim Holtz stamps with Dusty Concord Distress Ink. Then came the words, stamped on using black Stazon Ink. I edged these with purple gel pen and darkened the inside with a black pigment pen. Finally, I cut the 9 ATCs (2.5 x 3.5 inches each) and edged them all with Peeling Paint Distress Ink.
I feel I have cheated somewhat by only having the background overlapping. I can see there is quite an art in creating one large image which can then be cut up into 9 smaller sections that can stand in their own right. That's a challenge I set myself for the future! I am in awe of some of the other people who have completed this challenge. Check out Saturday's Workout page (see link on right of page).

I have also had this chipboard key, which I had coloured previously with crackle paint, knocking around for ages, so it was time it was used. Today, I added some teal paint to it to give a coppery look.
Having cut the shape of my house, I tried a new technique. I divided the layers of a paper napkin and attached part of the patterned sheet onto the right-hand side of the house using matte medium. It is difficult to see as it has a black background with light coloured flourishes, but I wanted it to be subtle. I then added a variety of patterns using a metallic paint dauber. This done, I added the picture of the barmaid and then added some arches over her head with Brilliance Ink. Having stuck on some paper lace at the bottom, also coloured with Brilliance Ink, the key was affixed and some Fresco Flakes added either side of the woman. To finish it off, I wrote the caption 'key to my thoughts', as I think the barmaid looks quite pensive and thoughtful. Who knows what she is thinking?
Apologies that there is some shine on my picture, it was difficult to eliminate the reflection from the metallic ink.

I made this collage using an image of an old book, an old map of Paris, a Tim Holtz ticket, a small postcard and various stamps (Blade Rubber Stamps and Blonde Moments) used with Distress Ink. To add extra detail I inked through some sequin waste to give the pattern on the left-hand side and I added the faux stitch border.


Crafting on a wet afternoon!
For this item I used a piece of card 4 x 6 inches printed with the image of an old ledger. To start, I stamped on the image of the woman with teal Archival ink. This was closely followed by the flower border, corner and swirl stamps using cobalt ink. I then decorated all of these with Gelly Roll pens. To add a little depth to the face, I lightly water-coloured the lips and eyelids. Then came the faux stitch border, edging the card with pink and I added the flower as the finishing touch.

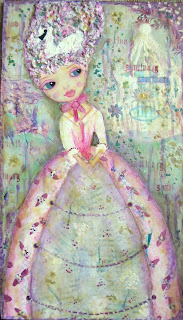
Last time I used purified beeswax on my doll, so this time I used the natural wax, which tends to be yellower in colour. She is strangely different, but I have to say she is growing on me!
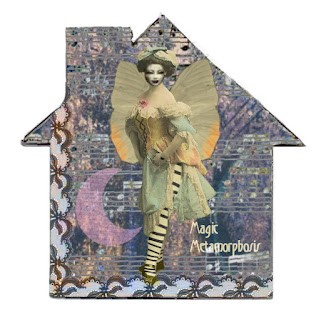
This digital collage is my response to three challenges!
The Three Muses challenge was 'Slightly Zetti', so I altered the lady's face and legs. The Dans ma Maison challenge was 'magic' so I gave the lady some wings. ACF 43 provided the original image of the woman.
I merged two pictures of houses to make the background, altered the woman and added the lace, moon and text.

